Introduction to Irrigation Systems
Irrigation is the artificial application of water to soil through various systems of tubes, pumps, and sprays. It is primarily used to assist in the growth of agricultural crops, maintenance of landscapes, and revegetation of disturbed soils in dry areas and during periods of insufficient rainfall.
Modern irrigation systems provide a solution to water scarcity, improve crop yields by up to 70% (according to the FAO 2023 report), and reduce the labor needed for watering by automating the process. The key is to select the right system for your needs and environment.
Types of Irrigation Systems
Choosing the right irrigation system depends on the size of your land, water availability, soil type, climate, and the crops or plants you're growing. Below are the most popular types of irrigation systems with their advantages, disadvantages, and use cases.
1. Surface Irrigation
This traditional method involves distributing water over the soil surface by gravity. It includes techniques like furrow, basin, and border irrigation. Although inexpensive, it can lead to water wastage and soil erosion if not managed properly.
- Best for: Flat fields, row crops like maize, rice, and sugarcane.
- Advantages: Low initial cost, simple technology.
- Disadvantages: Low water efficiency, labor-intensive.
2. Drip Irrigation
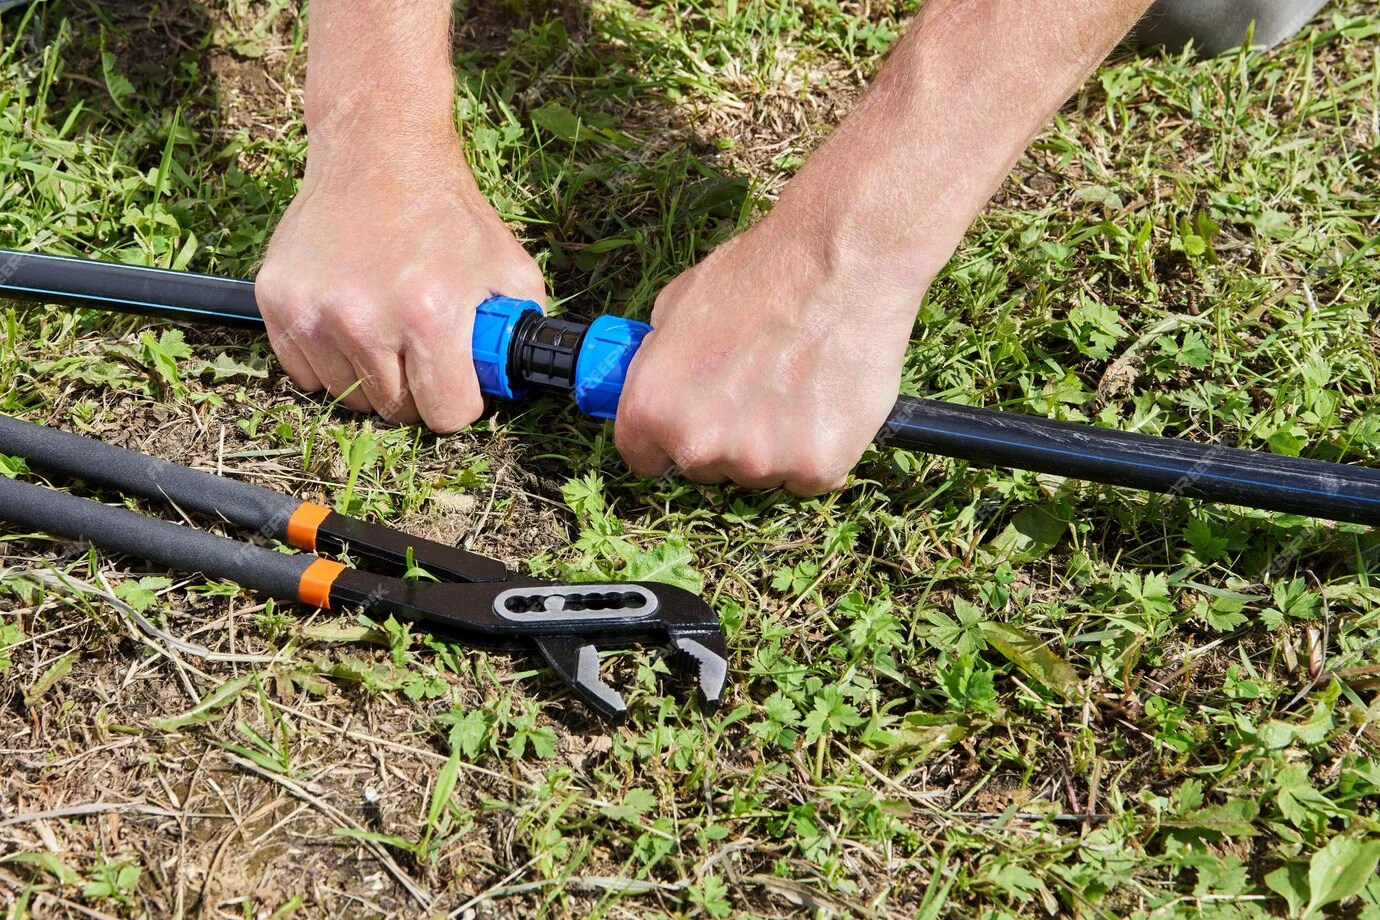
Also known as trickle irrigation, this system delivers water directly to the plant roots through a network of valves, pipes, tubing, and emitters. It's highly efficient and ideal for water-scarce regions.
- Best for: Vegetable gardens, orchards, greenhouses, potted plants.
- Advantages: Saves water (up to 90%), reduces weed growth.
- Disadvantages: High initial cost, clogging risk.
3. Sprinkler Irrigation
This method mimics natural rainfall by spraying water into the air using sprinklers. It’s flexible and suitable for many crop types and field sizes.
- Best for: Lawns, cereals, vegetables, golf courses.
- Advantages: Uniform water distribution, easy to automate.
- Disadvantages: Evaporation loss, wind interference.
4. Subsurface Irrigation
This advanced technique delivers water directly to the root zone through a system of underground pipes. It's efficient but requires expert design and setup.
- Best for: High-value crops, commercial farms.
- Advantages: Maximum water efficiency, no surface evaporation.
- Disadvantages: Expensive to install and maintain.
5. Manual Irrigation
Still widely used in small-scale gardens or for specific plants, manual irrigation involves watering plants using hoses, buckets, or watering cans. It gives complete control but is labor-intensive.
- Best for: Small backyard gardens, container plants.
- Advantages: Low cost, precise targeting.
- Disadvantages: Time-consuming, not scalable.
6. Center Pivot Irrigation
Used in large agricultural fields, this automated system uses a rotating sprinkler mounted on wheeled towers. The setup moves in a circular pattern to water crops uniformly.
- Best for: Corn, wheat, soybeans, and other large-scale row crops.
- Advantages: Efficient coverage, minimal labor.
- Disadvantages: High cost, not ideal for irregular fields.
7. Lateral Move Irrigation
Similar to center pivot, but instead of rotating in a circle, the system moves laterally across the field. It’s used in rectangular fields for uniform watering.
- Best for: Grains and pastures in rectangular plots.
- Advantages: Full field coverage, automation friendly.
- Disadvantages: Expensive, requires level terrain.
Comparative Table of Irrigation Types
| Type | Water Efficiency | Cost | Best Use |
|---|---|---|---|
| Surface | Low | Low | Large flat fields |
| Drip | High | Medium to High | Vegetables, Orchards |
| Sprinkler | Medium | Medium | Lawns, Grains |
| Subsurface | Very High | High | Commercial crops |
| Manual | Varies | Low | Gardens, Pots |
| Center Pivot | High | High | Large-scale fields |
| Lateral Move | High | High | Large rectangular fields |
Planning Your Irrigation Layout
Before starting the installation, proper planning ensures efficient water use, minimal waste, and reduced maintenance. Here’s how to plan your irrigation system for maximum impact:
1. Measure Your Area
Use a tape measure or online mapping tools (like Google Earth or GIS software) to determine the exact dimensions of the land you want to irrigate. Accurate measurement ensures proper coverage and prevents water waste.
2. Analyze Water Pressure and Flow Rate
Check your water source. Most sprinkler systems require at least 30 psi and a flow rate of 5-10 gallons per minute (GPM). Drip systems work well with low-pressure lines as low as 10-20 psi.
3. Create a Zone Plan
Divide your land into zones based on sunlight exposure, plant type, and water needs. For example, lawns might need more frequent watering than drought-tolerant shrubs.
4. Design Pipe Layout
- Use software like SketchUp or AutoCAD to draw pipe and emitter lines.
- Include a main line (water from source), lateral lines (leading to emitters/sprinklers), and valves.
- Position sprinklers to avoid overspray onto buildings, fences, or sidewalks.
5. Consider Local Weather and Soil
- Sandy soil: Requires more frequent watering but in smaller amounts.
- Clay soil: Requires slower application to avoid runoff.
- Slopes: Consider tiered zones or micro-irrigation to reduce runoff.
6. Check Local Regulations
Some cities have water-use restrictions or codes. Contact your local municipal office or agriculture department before installing underground systems.
Essential Tools and Materials
Depending on the irrigation system you're installing (drip, sprinkler, etc.), the required tools and materials may vary. Below is a universal checklist to help you get started.
Common Tools
- Shovel – For digging trenches.
- Pipe Cutter or Hacksaw – For cutting PVC or polyethylene pipes.
- Measuring Tape – To measure distance and pipe length.
- Pressure Gauge – To measure available water pressure.
- Drip Hole Punch Tool – For installing emitters in drip lines.
- Gloves and Safety Goggles – For protection during installation.
Materials for Drip Irrigation
- Polyethylene tubing (1/2”, 1/4”)
- Emitters (1–2 GPH)
- Filter (150 mesh recommended)
- Pressure regulator (10-30 psi)
- Barbed fittings (Tee, Elbow, Coupler)
- End caps and flush valves
Materials for Sprinkler Systems
- PVC or poly pipes (1”, 3/4” sizes)
- Sprinkler heads (rotary or fixed)
- Solenoid valves
- Backflow preventer
- Valve box
- Timer/controller unit (WiFi-enabled optional)
Recommended Brands and Prices (2025)
| Item | Brand | Approx. Price (USD) |
|---|---|---|
| Drip Emitters (100 pcs) | Rain Bird | $25.99 |
| Poly Tubing (100 ft) | Orbit | $19.95 |
| Sprinkler Head (Pop-up) | Hunter PGP | $12.50 |
| Controller with 6 Zones | Rachio 3 | $169.00 |
| PVC Pipe (1", 10 ft) | Charlotte Pipe | $7.80 |
Note: Prices may vary depending on your region and supplier.
Step-by-Step Installation Guide
Installing an irrigation system can feel overwhelming, but breaking it down into clear steps makes it manageable. Follow this detailed guide for a professional-quality installation:
Installing a Drip Irrigation System
Step 1: Connect to Water Source
- Attach a backflow preventer to your outdoor faucet to prevent contamination.
- Install a pressure regulator (typically 20–30 psi for drip systems).
- Add a filter to trap debris and extend system life.
Step 2: Lay Out Main Line Tubing
- Unroll the 1/2” poly tubing along the plant rows or beds.
- Use stakes every 3–5 feet to secure it to the ground.
- Cut the tubing with scissors or a tubing cutter as needed.
Step 3: Install Emitters and Micro Tubing
- Use a punch tool to create small holes in the main line.
- Insert barbed emitters or micro-tubing into the holes.
- Space emitters according to plant water needs (typically every 12" to 24").
Step 4: End the Line
- Fold the end of the tubing back and secure it with an end cap or figure-eight fitting.
- Flush the line before sealing to remove any debris.
Step 5: Test the System
- Turn on the water slowly to check for leaks, blockages, or improperly placed emitters.
- Adjust emitter locations if needed for optimal coverage.
Installing a Sprinkler Irrigation System
Step 1: Mark Sprinkler Locations
- Use flags or stakes to mark each sprinkler head’s location according to your layout plan.
- Ensure even spacing to avoid dry spots or overlapping coverage.
Step 2: Dig Trenches
- Dig trenches about 6–12 inches deep, depending on your local freeze depth and pipe diameter.
- Use a trencher machine for larger jobs or a shovel for small areas.
Step 3: Lay Pipes and Fittings
- Lay out PVC or polyethylene pipes in the trenches.
- Use T-joints and elbows as per your design to reach all sprinkler locations.
- Glue PVC joints securely with primer and cement (allow curing time).
Step 4: Install Sprinkler Heads
- Attach risers to the pipes where you marked sprinkler locations.
- Install sprinkler heads on top of the risers and adjust their angles.
Step 5: Connect Valves and Controller
- Install electric solenoid valves grouped in a valve box.
- Connect valves to a timer/controller to automate watering schedules.
- Wire valves carefully and use waterproof connectors.
Step 6: Test and Adjust
- Flush the system thoroughly before installing sprinkler heads fully.
- Turn on each zone separately and check coverage.
- Adjust nozzles, spray distance, and arc settings as needed.
Quick Pro Tip!
Install rain or soil moisture sensors with your irrigation controller to save up to 35% on water usage without affecting plant health.
Common Irrigation Installation Mistakes to Avoid
Even a well-planned system can fail if basic mistakes occur during installation. Avoid these common errors:
1. Incorrect Water Pressure
- Too much pressure can blow out drip emitters or pop-up sprinklers.
- Solution: Always install a pressure regulator suited to your system.
2. Poor Layout Planning
- Randomly placed emitters or sprinklers create dry zones or overwatering.
- Solution: Follow a careful zone plan based on plant types and sun exposure.
3. Not Flushing Lines
- Debris during installation clogs emitters and sprinkler heads.
- Solution: Always flush the entire system before sealing the ends.
4. Wrong Emitter or Sprinkler Spacing
- Overlapping spray patterns incorrectly or using the wrong emitter flow rate wastes water.
- Solution: Use manufacturer's charts to match emitter/sprinkler types to soil and plant needs.
5. Ignoring Freeze Protection
- Unprotected pipes can burst in freezing climates.
- Solution: Install drain valves or blow out the system before winter if necessary.
Irrigation System Maintenance Tips
Keeping your irrigation system in top shape ensures longevity and efficient water use. Here are essential maintenance practices:
1. Regular System Inspection
- Inspect emitters, sprinklers, valves, and pipes every month for leaks, blockages, or wear.
2. Clean Filters and Screens
- Drip systems require filter cleaning every 4-6 weeks, especially with well or river water sources.
3. Adjust Sprinkler Heads
- Seasonal changes might require adjusting spray patterns to avoid wasting water on sidewalks or driveways.
4. Reprogram Your Controller
- Update watering schedules based on seasonal plant water needs (e.g., less watering during rainy seasons).
5. Winterization
- In freezing regions, drain or blow out your system every fall to prevent pipe bursts.
Troubleshooting Common Problems
Problem 1: System Won’t Turn On
- Check timer settings and power source.
- Test solenoid valves manually; replace faulty valves if necessary.
Problem 2: Weak Water Pressure
- Look for clogged filters, broken pipes, or partially closed valves.
- Clean or replace clogged components.
Problem 3: Dry Spots on Lawn
- Adjust sprinkler head angles or replace damaged heads.
- Increase zone watering time if necessary.
Problem 4: System Leaks
- Inspect joints, emitters, and pipes for cracks or loosened fittings.
- Use pipe repair tape or replace damaged segments.
Problem 5: Water Runoff or Puddling
- Reduce flow rates or split zones into smaller sections to better match soil absorption rate.
Quick Tip!
If frequent problems occur, conduct a full zone audit to identify hidden pipe damage or deep blockages.
Real-World Case Studies
Case Study 1: Residential Lawn Irrigation
Client: A suburban homeowner with a 2,000 sq. ft. lawn in a temperate climate.
System: Sprinkler irrigation with smart controller and moisture sensors.
Cost: $1,200 for DIY installation (materials only), $2,500 for professional installation.
- Installation took 3 days using PVC pipes and Hunter pop-up sprinklers.
- The smart controller adjusts watering based on weather forecasts and moisture levels, reducing water waste.
- Estimated water savings: 30% per year.
Case Study 2: Commercial Greenhouse Irrigation
Client: A commercial greenhouse with 10,000 sq. ft. of growing space for organic vegetables.
System: Drip irrigation with zone-based control and automated fertigation system.
Cost: $8,000 for professional installation, including custom fertigation setup.
- Installed a drip irrigation system with a separate line for each crop type (tomatoes, lettuce, cucumbers).
- Fertigation system was integrated with the drip lines to automatically apply liquid fertilizers, improving crop yield and reducing labor.
- Estimated water savings: 40% compared to traditional overhead sprinklers.
- Return on investment (ROI): 18 months due to reduced labor and fertilizer costs.
Case Study 3: Agricultural Field Irrigation
Client: A family-owned farm growing corn and wheat across 50 acres.
System: Center-pivot irrigation system.
Cost: $50,000 for installation of the center-pivot system.
- The system uses a large rotating arm to provide even water distribution across the field.
- Equipped with soil moisture sensors to avoid over-watering and save on water costs.
- Annual water savings: 20%, with an increase in crop yield by 10% per season due to more efficient water use.
- ROI: 5 years due to enhanced crop yield and savings on water consumption.
Cost Analysis: DIY vs. Professional Installation
DIY Installation
Installing your own irrigation system can save you a significant amount on labor costs. However, it requires time, effort, and some technical knowledge.
- Cost: Materials typically range from $200 to $3,000 depending on system size.
- Time: DIY installation can take 1 to 3 days for small to medium projects.
- Pros: You save on labor, and have full control over the design.
- Cons: Risk of mistakes, wasted water, and additional repairs if not done properly.
Professional Installation
If you’re short on time or prefer a hands-off approach, hiring a professional ensures the system is installed correctly and efficiently.
- Cost: Professional services typically range from $1,000 to $10,000+ depending on the system complexity and size.
- Time: Installation by professionals usually takes 1 to 2 days.
- Pros: Guaranteed quality, faster installation, and expert guidance.
- Cons: Higher upfront cost, less customization compared to DIY.
Recommendation: If you’re confident in your skills and have the time, DIY can be a great cost-effective solution. However, for larger or more complex systems, professional installation offers peace of mind and optimal performance.
Frequently Asked Questions (FAQs)
1. How long does an irrigation system last?
With proper maintenance, an irrigation system can last between 10 to 20 years. Drip systems generally have a longer lifespan than sprinkler systems because they have fewer moving parts.
2. How much water does an irrigation system use?
The water consumption of your system depends on the type of system, the plants being watered, and your local climate. Drip irrigation systems typically use less water than sprinklers, as they deliver water directly to the roots without evaporation loss.
3. Can I install an irrigation system myself?
Yes, many homeowners install irrigation systems themselves. However, it requires some knowledge of pipe fitting, pressure regulation, and system design. If you're unsure, consulting a professional is recommended.
4. How often should I check my system for leaks?
Check your irrigation system at least once a month, especially after installing or during seasonal transitions. Ensure that all emitters and sprinklers are working correctly and that no water is being wasted.
5. Do I need a permit for installing an irrigation system?
It depends on your location. Some municipalities require permits for large or underground irrigation systems. Always check local regulations before installation.
6. What is the best type of irrigation system for a vegetable garden?
Drip irrigation is ideal for vegetable gardens as it minimizes water waste and delivers water directly to the roots, preventing evaporation and runoff.
7. Can I automate my irrigation system?
Yes, most modern irrigation systems come with controllers that can be set to run automatically based on weather conditions, soil moisture, and time of day. Many are Wi-Fi enabled for remote management.
Conclusion
Incorporating an irrigation system into your landscape or agricultural project is a wise investment for water efficiency, plant health, and long-term cost savings. Whether you're installing a simple drip system for your garden or a sophisticated center-pivot irrigation system for large-scale farming, understanding the key steps, common mistakes, maintenance needs, and troubleshooting methods is crucial to success.
By following the installation guides and tips provided in this article, you can create a system that delivers water exactly where it's needed, with minimal waste. The choice between DIY and professional installation depends on your budget, available time, and technical expertise. If you're comfortable with the process and want to save on labor, DIY is a cost-effective option. However, for more complex systems, professional installation ensures top-notch performance and peace of mind.
Regular maintenance and periodic checks are essential to keeping your system running smoothly and preventing costly repairs. Additionally, by incorporating smart controllers, moisture sensors, and other modern technologies, you can optimize water usage and save even more.
Ultimately, the right irrigation system will help you achieve lush gardens, healthy crops, and a sustainable water usage plan. Whether for a small residential space or a large-scale commercial operation, an efficient irrigation system is the key to a thriving landscape.

0 Comments
No approved comments yet. New submissions appear after moderation.